
|
| |||||||||||||||||||||||||||||||||||||||||||||||||||||||||||||||||||||||||||||||||||||||||||||||||||||||||||||||||||||||||||||||||||||||||
|
Contents
The Journeyman Project Recap
After a brutal third world war, Earth finally achieved peace and unity in the twenty-second century. Two hundred years later, in 2308, the planet was visited by an alien race who called themselves the Cyrollans. They broadcasted a message saying that they had come to invite Earth into a consortium of intelligent space faring races known as the Symbiotry of Peaceful Beings. They indicated that they would give us exactly ten years to consider their proposal, and then departed.
On the day of the Cyrollans' return to Earth, Agent 5 was on duty at the TSA. As the Cyrollan fleet came into sight, the temporal distortion warning alarms began to wail. Someone had gone back in time and altered history in three places. With only minutes to spare before history was changed forever, Agent 5 jumped back in time to investigate the distortions. It didn't take him long to find the sources - three androids that had been sent back into the past, each with a mission to significantly alter history. Drawing on years of training, Agent 5 managed to disable each of the robots and access their memory recordings to piece together what was going on.
With only moments remaining until the ambassador walked into the line of fire, Agent 5 located Sinclair's rooftop emplacement and apprehended the crazed scientist, thereby ensuring humanity's acceptance into the Symbiotry of Peaceful Beings. Installation - Windows 3.1* (red or black install disk) Insert Disc #1 into your CD-ROM drive. Select "Run" from the "File" menu and click on the button labeled "Browse." Type the drive letter of your CD-ROM drive, followed by a colon (e.g. D:). Click on the file "SETUP.EXE" displayed in the file list box, and then click "OK" to return to the Run dialog box. Click "OK" again to run the setup program. During the installation process, you will be prompted to confirm various options and actions. Be sure to restart Windows when the installation has been completed. To run Buried in Time, double-click on the Buried in Time icon in the Program Manager. If you have any problems with the installation process, click here for installation troubleshooting instructions. *NOTE: This version will also run on Windows95! Just download the Buried in Time Upgrade for Windows95 Installation - Windows 95/98* (light blue install disk) Insert Disc #1 into your CD-ROM drive. You should be presented with a menu offering various selections. Select "Install Buried in Time." If this menu does not appear, use the "Add/Remove Programs" wizard accessible from the Control Panel. During the installation process, you will be prompted to confirm various options and actions. When the installation has been completed, you can run Buried in Time by selecting it from the "Start" menu. *NOTE: Before installing Buried in Time, confirm that your CD-ROM drive and sound card are installed and working properly. Installation - Windows XP/Vista/7 (online download only) For technical assistance with GOG.com's installer, please visit their online forum or support pages. For issues related to running the game, including a DxDiag (Direct X Diagnostic file) can help expedite tracking the problem. Here are Microsoft's instructions for 2000/XP and Vista/7. Installation - Macintosh (7.1 to 9.2.2) Copy the folder "Copy Contents to Hard Drive" to your hard disk. You may rename this folder "Buried in Time Folder" if you like. NOTE: If you have QuickTime 2.5 or later installed, you may skip this step. Otherwise, open the "Files for System Folder" folder on the CD-ROM and drag "QuickTime", "Sound Manager", and "Apple Multimedia Tuner" onto your System Folder (copy "QuickTime Power Plug" too if your Macintosh has a PowerPC processor), then click OK at the prompt. If a dialog box prompts you again that a newer version of one or more of these extensions already exists, click the CANCEL button. However, if a dialog box prompts you that an older version already exists, choose to replace it. If any of these extensions are "already in use", you will need to manually remove the existing copy(s) from the Extensions folder within your System Folder and try again. Now make sure that you are running in THOUSANDS of colors and that Virtual Memory is turned OFF by accessing the Monitors and Memory control panels, respectively. Like Virtual Memory, software such as RAM Doubler and OptiMem are incompatible with Buried in Time, and should also be turned OFF. Finally, restart with only necessary extensions active. Buried in Time only needs QuickTime, QuickTime PowerPlug, Multimedia Tuner (for QuickTime 2.0 or older only), Sound Manager, and your CD-ROM driver. Finally, double-click the appropriate "Buried in Time" file that you copied to your hard drive to launch the game. You may discard the version of Buried in Time that does not match your processor. File Functions and Command Keys To access the 'File' menu options and other game controls, activate the Interface Biochip by selecting it in your inventory display area, and then clicking on its picture icon. Now click the 'Menu' button on the 'Biochip Display Panel' to bring up the file options and preferences. To save your game-in-progress onto your hard drive so that you may return to it later, click the 'Save' button. This will bring up a standard dialog box for saving a file. You will not be able to save your game onto the CD-ROM, so be sure to select your hard drive as the volume on which to save the game. You may return to a previously-saved game by clicking the 'Restore' button. The 'Flicker' and 'Transition Speed' controls effect the presence of animation on still frames and the speed of turning, respectively. If the game seems sluggish on your computer, you may want to turn off flicker and set the transition speed to maximum. Additionally, while playing the game you can hold down the 'Control' key on your keyboard ('Option' key on the Macintosh) for 'Quick Mode', which will skip the walking animations when you press the forward button, and jump you to the next stopping point. The following functions may be accessed with command keys:
Interface Overview
B - Inventory:
C - Biochips:
Jump Biochip:
Files Biochip:
Cloak Biochip:
Evidence Biochip:
D - Navigation: Jumpsuit Overview
Though the Jumpsuit offers freedom of travel, it does not provide the agent with much protection. For this reason, it has been equipped with cloaking technology that renders it invisible to onlookers. This feature is vital to the members of the Deep Time Unit, who must exercise extreme discretion while researching the past. However, as moving destroys the illusion of invisibility, the suit's navigation buttons are disabled while it is cloaked. The Jumpsuit has also been equipped with an oxygen re-breather and compressed air supply for environments with little or no oxygen. This reserve will immediately refill once the agent has returned to an oxygenated environment. The final significant feature of the Jumpsuit is the temporal pocket. Items collected by an agent are stored in this pocket, which is actually a null-space void. When placed in the void, objects take up no space and are not a burden to the agent. Such items can be easily retrieved by just dragging their inventory display icons into the main view window. Getting Started You will first need to follow the appropriate installation procedure to get Buried in Time running on your computer. After you've launched the game, you can press the space bar to skip the splash screens and credits, and bring up the main menu. At the main menu, click the 'Interface Overview' button to get a guided tour of the game's interface. When the overview is finished, you will be brought back to the main menu. After reading the message on the left side of the screen, choose a play mode, set the volume, and press the 'New Game' button. After the opening animation, the Jumpsuit will automatically pull you forward in time, and control of the game will pass over to you. At this point, you will want to get your bearings. Start by exploring the game's movement interface in the lower right corner of the screen. Try turning to your left and right, and looking up and down. Once you've gotten used to looking around, turn to face the round greenhouse-like room and press the forward arrow button. When you're directly in front of that room, turn to your right so that you're facing it, look down. An opening will appear and the forward arrow button will highlight. Click the forward arrow button. You will be moved forward into the room. Turn to your right and walk forward once. Turn right again and look down at the seat. Move your cursor over the object you see there. The hand cursor means that you can pick that object up. Click on it, and with the mouse button held down drag it down off the bottom of the view screen and then let go. You just picked up the remote control. Click the Inspect button (magnifying glass icon) between the inventory scroll arrows. This will bring up an info screen on that object. Click again to remove it. Now look up, turn to your left, and press forward again. Turn to your right, look down, and click on the seat in front of you. Once you're sitting down, move the cursor over the object at the bottom of the screen. It will turn into a magnifying glass to indicate that you can zoom-in on that object. Click on it. This is the Environ system. The Environ system has three modes: Environ mode, cartridge mode, and network access mode. These are accessed with the 'Environ' button, the center area, and the 'All-Sat' button, respectively. Click the 'All-Sat' button to go into network access mode. Watch each of the four stories on INN - they will give you some important information. Now try jumping to a time zone. To do so, scroll to the 'Jump Biochip' item in your inventory, and click on its picture. Next click the 'Jump Menu' button and select a time zone. Your future self has hidden some information somewhere in the house which is vital to your success, and you can't jump to any of the time zones until you've gotten it. Take some time to explore the house. Once you've found the message and are somewhat confident that you know what you're looking for, you can begin jumping to the other time zones. Tips & Hints The most important thing to remember while playing Buried in Time is to save often. If you remember to save your game regularly, and under a different name each time, you'll create a record of your journey that will allow you to restart from any point along the way. If you die while playing in Walkthru Mode, you can return to where you were before the tragic event by clicking the 'Try Again' button, but don't forget to save your game before quitting!
As in The Journeyman Project, you will receive a score based on your performance. The factors you will be scored on include the amount of evidence you gather, the number of puzzles you solve, how much research you do, and whether or not you finished the game. But unlike the first game, you will not be judged on the amount of time it takes you to complete a time zone. So don't feel rushed - spend as much time as you like exploring each of the environments. 15,000 points is a perfect score. Credits
| |||||||||||||||||||||||||||||||||||||||||||||||||||||||||||||||||||||||||||||||||||||||||||||||||||||||||||||||||||||||||||||||||||||||||
 In Buried in Time, you once again assume the role of Gage Blackwood, better known as Agent 5 of the Temporal Security Agency. As an agent of the TSA, it's your responsibility to ensure that history is not altered by anyone with the ability and inclination to do so. Following is a recap of recent Earth history, the founding of the TSA, and the plot of the original Journeyman Project.
 Meanwhile, the accomplished physicist Elliot Sinclair had built a prototype time machine under government contract. However, after its maiden voyage, the project was scrapped.
  The time machine, known as Pegasus,
was dismantled and secretly reconstructed in the Temporal Security Annex, a top-secret government facility established for the purpose of safeguarding history from sabotage.
The time machine, known as Pegasus,
was dismantled and secretly reconstructed in the Temporal Security Annex, a top-secret government facility established for the purpose of safeguarding history from sabotage.
 The robots had been sent by Dr. Elliot Sinclair. Fearing that the Cyrollans were planning an invasion, Sinclair constructed a new time machine and sent his android servants back in time to change history so as to make Earth a less appealing target. And should they have failed, Sinclair was prepared to assassinate the Cyrollan ambassador as a sign of defiance.
 + 'S'
+ 'S'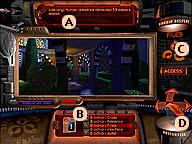 A - Message Window:
 The Time Displacement Unit, more commonly known as the Jumpsuit, is the Temporal Security Agent's mode of time travel. Each of the TSA's 10 Jumpsuits have been coded specifically to the DNA of the agent to which it has been assigned, and cannot be used by anyone other than the assignee. Unauthorized tampering with the suit will result in the self-destruction of its neurocircuitry.
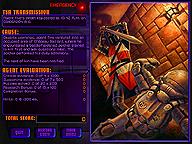 Scoring
| Buried In Time » Reviews | Quotes | Guide | Gallery | Hints | Manual | Troubleshooting | Requirements | The Making of |
| Presto Home » Titles | Links | Cool Stuff | Forum | Support | About Presto » Blog | Facebook | Twitter | YouTube |